|

|
||||||||||||||||||||||||||||||||||||


|
Choosing
telescopes and binoculars
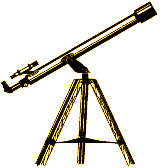
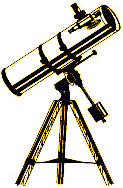
a beginner's guide EVERY amateur astronomer wants to own a telescope – and the bigger the better. But for a starting instrument don’t overlook binoculars (see the box), which are often cheaper and better value than small telescopes, and will show you many interesting objects. Other basics for beginning skywatching include a planisphere (a circular star chart with a mask that rotates to show the stars on view at any particular time) and a simple star atlas. Armed with these and a pair of binoculars, you can learn the basic sky sights with little outlay. And the money will not be wasted – the binoculars will always be useful, even if you eventually graduate to a large telescope. Telescope basics There are two main types of telescope: refractors (the spyglass type) which use lenses to collect and focus light; and reflectors, which collect light with a mirror. To choose the right telescope, you need to know the relative advantages of each type. Telescopes
are judged by not their magnification but their aperture, i.e. the diameter
of the main lens or mirror. When astronomers refer to a 'small' telescope
they mean one with a small aperture. The aperture governs how much light
the telescope collects – and the more light it collects, the more you can
see. Hence it is best to get the largest aperture telescope you can afford,
whether a refractor or reflector.
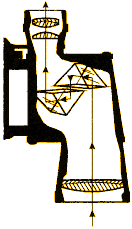
The smallest telescopes, i.e. those with apertures under 75 mm or 3 inches, are always refractors. Telescopes with larger apertures are usually reflectors, since large mirrors can be made more cheaply than lenses. The smallest refractors, of 50 or 60 mm (2 or 2.4 inches) aperture, will show the Moon's craters and dark lowland "seas" (the maria), Saturn's rings, Jupiter's cloud belts and its four main satellites, some attractive double stars, and various nebulae and galaxies. Small or medium-sized reflectors have apertures of 100 mm (4 inches) or larger. They will usually show fainter objects and finer details than small refractors. Although a small refractor may appear a good first buy, there is one very important warning. Many low-budget refractors are either poorly made or make misleading claims as to their performance. In the worst cases the telescopes may be useless for astronomy, even though their finish may be apparently good. Unfortunately, even some leading stores sell telescopes which are of very poor optical quality. One of the main failings of simple lenses is that they produce fringes of false colour around objects, an effect known as chromatic aberration. A lens which is corrected for such false colour is termed achromatic so it is worth looking for this in the description, although it still does not guarantee good performance. Mirrors do not suffer from chromatic aberration. What to look for If possible, make the following checks before buying a small refractor: * Look down the tube through the main lens. Is there a stop – a disc with a small hole in it – a short way down the tube? (This should not be confused with light baffles, which are a series of rings of decreasing diameter positioned at intervals down the tube.) Such a stop is an attempt to sharpen the image, like using a small f-stop on a camera. Unfortunately, it drastically reduces the effective aperture, and hence the image brightness. Telescopes of this sort will show you virtually nothing that you cannot see with the naked eye. If they claim to use the full size of the lens, they are being fraudulently advertised. * Observe the Moon at night. Its edge should be sharp and free from obvious false colour. Make sure you observe outside, and not through a window, closed or open. If the telescope fails either of these tests, do not buy it or return it for a full refund. Magnification The magnification of a telescope depends on the eyepiece used. Telescopes usually come with a selection of eyepieces that offer low, medium and high powers. Do not get carried away by advertisements for small telescopes that claim magnifications of many hundreds of times. Too high a magnification will show less rather than more, since an over-magnified image will be faint and indistinct. A good rule of thumb is a magnification of twice the aperture in millimetres (or 50 times for each inch of aperture – see Telescope Performance table below). Of course, if the telescope's aperture is stopped down, the maximum usable magnification is correspondingly reduced. The atmosphere itself places a limit on the highest magnification you can use, because air currents make the images of stars and planets unsteady, an effect known as seeing. No matter how large a telescope you own, from a normal ground-level site the maximum usable magnification will be about 300. Beyond this, an eyepiece just magnifies the distorting effect of the atmosphere, creating a useless "boiling" image. Telescopes, like cameras, have f-numbers. The focal length of a telescope is the length of the light path from the main lens or mirror to the eyepiece. The focal ratio (or f/ratio) of a telescope is its focal length divided by its aperture. For example, a telescope of 100 mm aperture with an 800-mm focal length is an f/8 instrument. Focal
length is not a critical consideration, but it does determine what objects
an instrument is best suited for observing. For example, f/4 to f/6 telescopes
are preferred by people who like to observe deep-sky objects such as nebulae
and galaxies. However, others who like to view the Moon and planets opt
for f/7 and above.
Mountings The simplest
type of mounting, used by small refractors, is the altazimuth design. This
requires you to move the instrument simultaneously about both axes (the
altitude and azimuth) to keep an object in the field of view.
Larger telescopes incorporate an equatorial mount, which needs to be set up more carefully with the polar axis pointing to the north celestial pole, near Polaris. An equatorial mount is more expensive but has the advantage that objects can be kept within the field of view as the Earth rotates by turning the telescope around the poleward-pointing axis only. In recent years the Dobsonian mount has become increasingly popular as a low-cost, portable alternative to equatorials. It incorporates a modified altazimuth design, and is best suited to reflectors used with low-power eyepieces for wide-angle viewing of the sky, in which precise tracking is not essential. Department store and mail-order-catalogue refractors often employ notoriously unstable and clumsy desktop tripod mountings. There is no point in buying a telescope with a shaky mounting, as you will be unable to see anything properly, particularly when the wind blows. Also, remember that comfort and ease of use are vital. You will not enjoy using a telescope if you have to kneel down and crane your neck to look through it. Most small refractors have so-called slow motions, which are gears, often with flexible cables, linked to the axes. They allow you to follow objects by turning knobs. Beware of stiff slow motions which are more trouble than they are worth. The more expensive mounts have motor drives, which track an object without any effort. These are particularly useful when observing planets. Eyepieces Eyepieces are the most important accessory you will buy. Regardless of how good a telescope's lens or mirror may be, its performance will be seriously degraded if the eyepieces are of poor optical quality. Eyepieces are interchangeable, and provide different magnifying powers, determined by their focal length. They are marked with numbers, such as 25 mm, which indicate their focal length. The longer the focal length, the lower the magnification but (generally) the larger the field of view. Lower powers are best for observing faint, diffuse objects such as comets, nebulae and galaxies, while higher powers are best for the Moon, planets and double stars. The magnifying power of an eyepiece can be found by dividing its focal length into the focal length of the telescope. Hence a given eyepiece will provide higher magnification on a telescope of long focal length than one of short focal length. The cheapest acceptable eyepiece for amateurs is the Kellner design. It offers a useful field of view, spanning up to 45°. The designs known as the Erfle and the orthoscopic are more expensive alternatives, offering better optical performance. People looking through an astronomical telescope for the first time are usually surprised to find that the image is upside down. This is a basic characteristic of a telescope, and for daytime use it is corrected by using extra lenses or what is termed an erecting prism. It makes little difference which way up an astronomical body appears, so astronomers usually accept the basic upside-down view. Some small refractors are provided with a star diagonal (an encased prism) to turn the image the right way up, but left and right are reversed. Bear this in mind when looking at the Moon and planets. Don't blame your eyepieces for a poor image if your telescope is simply pointing out of a window; the difference in air temperature inside the room and outside causes turbulence which distorts the starlight. Finders A telescope should have a smaller finderscope attached to its main tube. This is a low-magnification telescope used for aiming the main instrument. A typical finder has a magnification of 6 and an aperture of 30 mm, described as 6 x 30. The cheaper instruments often have 5 x 24 finders, which invariably have stops in them restricting the working aperture to about 10 mm. They will help locate the brightest objects, but little else. Check your telescope There are a number of simple tests you can perform on equipment to test its quality. Tap the tube lightly. The image should take no more than three to five seconds to stop shaking. Some people hang a weight from the centre of the tripod to improve its stability and to damp down vibrations. The only easy test for optical quality is to observe a star image after allowing the telescope to reach outside temperature, which may take an hour, and on a night when the seeing is excellent. Using the maximum usable power (see Telescope Performance table above), examine the image of a moderately bright star. When perfectly focused it should be a point or very small disc of light surrounded by faint rings. In poor seeing this appearance may be hard to achieve with even a good telescope. Defocus the image on both sides of the focus point. In both cases it should become an evenly illuminated and circular disc, although in the case of a reflector you will see the shadow of the secondary mirror in the middle. If it is impossible to achieve perfect focus, and the image appears as a short line on either side of focus, the telescope is suffering from the optical defect called astigmatism. Cost So what's all this going to cost you? A decent pair of 8 x 40 binoculars can be purchased for £50. A reasonable 80-mm refractor will set you back about £150, while a 4-inch reflector can cost as little as £250. Remember that a telescope is a precision optical instrument and so you should be prepared to pay as much as for a good camera. Legal issues If you use a credit card to purchase equipment worth £100 or more, on which the workmanship is shoddy or the goods are damaged in the post, you will have redress to the law through the Consumer Credit Act, 1974. Try to resolve the matter with the retailer, but if that fails write to both your local Consumers' Association office and your credit card company. If you feel you have been misled in any way, or that the specification of the telescope has been falsely described, you should complain to your local trading standards office. Indeed, it is your duty to do so. Binoculars – a good first choice
THERE are many beautiful sights, such as the star fields of the Milky Way, star clusters such as the Pleiades and Hyades, and ghostly comets, which can only be truly appreciated in low-power, wide-field binoculars. These compact, simple devices are the ultimate in portable, easy-to-use equipment, and many observers use them to complement their telescopic observations. Binoculars are usually marked with figures such as 8 x 40, 7 x 50, or 10 x 50. The first figure is the magnification, and the second is the aperture of the front lenses in millimetres. For general observing, 7 x 50 or 10 x 50 binoculars are equally useful. If you find the weight of 50-mm binoculars a problem, go for 40-mm or even 30-mm models. Avoid binoculars with magnifications greater than 12, which will be difficult to hold steady, unless you have a particular need for a specialist pair. Zoom binoculars should be avoided, too, as they generally have narrow fields of view and poor optics. Good binoculars will have coloured coatings on the optics, similar to non-reflective coatings on spectacles, which improve the image brightness by increasing transmission of light. Some cheap mail-order binoculars economise by using prisms that are too small, which severely limit the field of view. Look into the front lens – you should see a small circle of light through them. If the circle is cut off or square, you are losing light. Also be aware that very cheap models may have spurious bulges in the barrels to give the impression that they contain prisms when they do not. Such instruments are simply opera glasses with a straight-through optical system, having a very restricted magnification and field of view. And the best telescope is... So what is the best telescope for you? The simple answer is: it's the one that you think you'll use the most often. Ease of set-up, simplicity of use and portability should be key factors in your decision. Move up to larger equipment only when you have proved to yourself that you can get out to observe on a regular basis. Also, make contact with your local astronomical society who will be able to give you advice on equipment and its use. Their address should be available from your local library. A safety warning Many telescopes are supplied with eyepiece filters. They soften the glare of the Moon, Sun and the brighter planets. Unfortunately, they are often of low quality, and the solar filters in particular can be extremely dangerous. They can easily crack under the focused heat of the Sun, and should be avoided. Remember, it only takes a fraction of a second of unfiltered sunlight to cause permanent blindness. The only safe way to observe the Sun is to project its image onto a white card. Never observe it through the main telescope or the finder, even if it has a filter. Original text
by Steve Tidey of the Association for Astronomy Education.
|
||||||||||||||||||||||||||||||||||